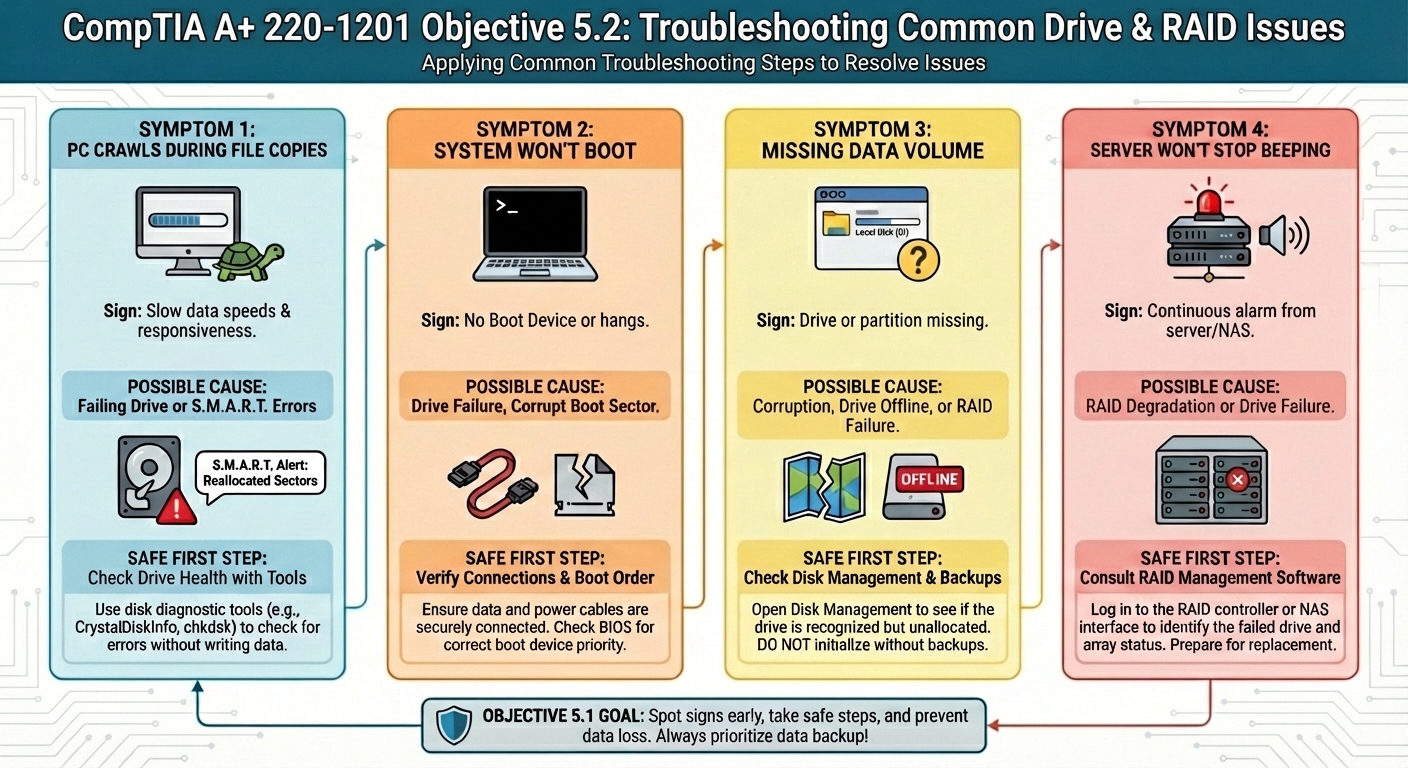
Drive and RAID problems show up in everyday support tickets: a PC that crawls during file copies, a system that won't boot, a missing data volume, or a server that won't stop beeping. CompTIA A+ 220-1201 Objective 5.2 expects you to spot these signs early and take safe first steps before data loss gets worse.
A single drive issue affects one disk and the data stored on it. A RAID array issue affects a group of drives working together, so one failed member or a controller problem can make an entire volume disappear, even if some disks still spin up.
This section focuses on the symptoms you're likely to see first: S.M.A.R.T. failure warnings, extended read/write times, low IOPS (slow input/output), missing drives in the OS, an array missing in RAID tools, and audible alarms. You'll also learn quick checks that don't add risk, plus clear cues for when to escalate to backups, a senior tech, or vendor support.
Start with safety and the right first questions before you touch a RAID system
RAID troubleshooting has a unique risk: a "helpful" click can turn a recoverable outage into permanent data loss. Before you reseat a cable or pull a drive, slow down and treat the system like evidence. Your first goal is to preserve the current state, because the best fix depends on what failed (disk, controller, backplane, firmware, power, or file system).
Also, separate two priorities early: restore service and protect data. In many cases, you can do both, but only if you confirm backups and document what you see. A careful first pass often shortens downtime, because you stop guessing and start building a timeline.
What to ask and check first (users, logs, recent changes, and backups)
Start by interviewing the person who noticed the issue and the person who last touched the system. RAID failures often follow a trigger, such as a power event or a "quick" change after hours. A clear timeline helps you avoid the wrong fix, like rebuilding when the real problem is a loose cable or a controller that lost its config.
Use this short checklist to gather facts before you act:
- What changed recently: Was there a power loss, UPS alert, firmware update, OS update, chassis move, cable swap, or a new drive added?
- What symptoms appeared and when: Did users first see slow file copies, app timeouts, boot delays, a missing volume, or a RAID alarm?
- Any recent slowdowns: Did performance drop days earlier (low IOPS, long read/write times), or did it fail suddenly?
- Backups: Do backups exist, and were they tested with a restore (not just "backup succeeded")?
Next, collect objective evidence. Check OS event logs for disk, storage, or controller errors (for example, repeated timeouts, reset events, or file system warnings). Then review the RAID controller logs or vendor tools for member disk states (online, degraded, failed), cache issues, battery status, and previous rebuild attempts. These logs turn "I think disk 3 failed" into "slot 3 reported medium errors at 02:14."
Finally, document the hardware layout before touching anything:
- Record drive bay numbers and serial numbers for each disk.
- Note the reported role of each disk (member, spare, failed) in the controller utility.
- Take photos of the front bays and any status LEDs if policy allows.
A RAID chassis is like a row of identical keys. If you mix them up, you may never open the lock again. Label first, swap later.
Simple rules that prevent data loss during RAID troubleshooting
When an array goes missing, the pressure to "get it back" can push people into the worst options. Some actions are easy to undo, while others rewrite metadata and erase recovery paths. Treat the controller prompts as high risk until you confirm what they mean.
Follow these rules to reduce the chance of turning a fault into data loss:
- Don't initialize, format, or create a new array to "fix" a missing volume. Those steps can overwrite RAID metadata and file system structures. If the controller offers "initialize" as a default, stop and verify the current member disks first.
- Don't rebuild onto the wrong disk. Rebuild writes data to a target drive. If you choose a good disk as the target by mistake, the controller can overwrite the only remaining valid copy.
- Don't mix up drive order or slots. Some RAID systems rely on slot order and stored metadata together. Pulling multiple drives at once, or returning them to the wrong bays, can confuse detection and complicate recovery.
- Don't hot-swap unless you confirm support. Many servers support hot-swap, but not all controllers, enclosures, or drive types do. If you guess wrong, you can cause a bus reset, drop more disks, or crash the OS.
- Protect against electrostatic discharge (ESD). Wear an ESD strap when required, handle drives by the edges, and avoid stacking drives on conductive surfaces. ESD damage can be silent and intermittent, which is hard to troubleshoot later.
- Stabilize power. If the system has a UPS, confirm it works and the load is reasonable. Power loss and brownouts often correlate with degraded arrays, write cache issues, and "dirty" shutdowns.
A good mental model helps: RAID recovery is closer to surgery than tinkering. You want controlled steps, not trial and error.
If a tool asks "Initialize?" and you are not 100% sure, treat it like "Erase?" and back out.
Know what RAID can and can't do for you
RAID exists to improve availability, and in some setups it can improve performance. It does not replace backups, and it does not prevent every outage. Understanding the basic promise of each RAID level keeps your expectations realistic during troubleshooting.
Here is the practical view you need for CompTIA A+ style scenarios:
- RAID 1 (mirroring): Two drives hold the same data. If one drive fails, the system can often keep running on the other. However, RAID 1 does not protect against accidental deletion, file corruption, malware, or a bad update that damages the file system.
- RAID 5 (striping with parity): Often survives one disk failure while staying online (depending on controller and workload). Rebuilds can be long, and performance may drop during rebuild. If a second disk fails before rebuild finishes, the volume may go offline.
- RAID 10 (mirrors of stripes): Can survive more than one disk failure in some cases, but not if both failures occur in the same mirrored pair. This is why documenting bay numbers matters, because "two failed disks" does not always mean "total loss."
Even when RAID keeps the volume online, symptoms can appear early. A single weak disk can cause slow I/O due to retries, timeouts, and error correction. As a result, users may report lag, long boot times, or slow file copies days before a disk finally drops out. Similarly, a controller cache problem or a failing battery can force write-through mode, which can feel like sudden low IOPS without an obvious disk failure.
The takeaway is simple: RAID buys you time, not immunity. Use that time to confirm the fault, protect power, and verify that backups are ready before you attempt any rebuild or member replacement.
How to recognize early drive failure signs, before the array goes down
Drive failure rarely starts with a clean, obvious break. More often, the system keeps running while the storage quietly struggles. You might see small delays, odd warnings, or brief freezes that "go away" after a reboot. Those are the moments to act, because RAID only helps if you replace weak parts before a second problem hits.
Early detection comes down to three signals you can measure: S.M.A.R.T. health data, rising read/write times, and falling IOPS. Learn to spot them, then respond in a way that protects data first and restores performance second.
S.M.A.R.T. failure: what it means, common triggers, and what to do next
S.M.A.R.T. stands for Self-Monitoring, Analysis, and Reporting Technology. In simple terms, it is a drive's built-in health report. It tracks error trends, and it can warn you before a drive fully fails. However, S.M.A.R.T. is not perfect. Some drives fail without much warning, but a S.M.A.R.T. alert is still a serious sign.
Common S.M.A.R.T. triggers you may see include:
- Reallocated sectors: The drive found bad spots and moved data elsewhere. A rising count suggests the media is degrading.
- Current pending sectors: The drive cannot read some sectors right now and plans to retest them. Pending sectors often correlate with freezes and slow reads.
- Read error rate or uncorrectable errors: The drive struggles to read data even after error correction and retries.
- Temperature warnings: Heat accelerates failure risk and can increase error rates.
You may encounter S.M.A.R.T. warnings in several places. Some systems show a BIOS/UEFI message during POST. In addition, you might see alerts in vendor management tools (for example, the RAID controller utility, NAS dashboards, or OEM storage software). Operating systems can also surface disk warnings in system logs or notification areas, even when the volume still mounts.
When you see a S.M.A.R.T. warning, use a strict response order:
- Back up data first (or verify recent backups and run a test restore if time allows). Avoid stressing the disk with unnecessary scans.
- Confirm the alert with a trusted tool (OS disk health, vendor diagnostics, or controller logs). Record the exact attribute and raw value when possible.
- Plan replacement based on urgency.